Red Velvet Layer Cake with Cream Cheese Frosting.
Red velvet cake is so much more than a white or chocolate cake tinted red. This iconic cake is a masterpiece of flavors, textures, and frosting. Learn all my tricks and tips to perfecting this classic recipe at home!

I’m out of control excited to share this recipe with you.
This is the holy grail of layer cakes. The most romantic, gorgeous, vibrant cake of all time. The “I can’t quite put my finger on the flavor” cake. Dense, yet soft ‘n light. The sweet marriage of buttermilk and vanilla with a little cocoa on the side. Tall, dramatic, and completely covered in tangy cream cheese frosting.
This, everyone, is one and only red velvet.


As I’ve told you many, many times before, I’ve always been unsure about red velvet. Quite honestly, I don’t really trust a cake that has a mystery flavor. Is it vanilla? Is it chocolate? Is it just a butter cake colored red? Why is dessert so confusing! Whatever, I’m ordering cheese fries.
That was until I learned the beauty of this mighty flavor. From brownies and cookiesto bars and brownies again, I’ve had quite a lot of fun getting to know red velvet. Mild chocolate intertwined with the unmistakable taste of buttermilk, a generous dose of vanilla, and plenty of butter flavor. These four flavors make up the mystery of red velvet and are essential to perfecting a red velvet layer cake. Not only are the flavors fabulous, red velvet cake’s texture is something to write home about. It’s dense but soft with a moist, tender crumb. My absolute favorite part about red velvet cake, though, is the cream cheese frosting. Slathered on thick, this frosting is delicately sweet and undeniably creamy.
Baking Science/Nerd Alert…
Enough red velvet rambling, let me tell you about my specific recipe. There are reasons I use specific ingredients, certain amounts, and unique mixing techniques, so pay attention if you’re looking to recreate this cake at home.
Important red velvet cake tip #1: Cake flour. I highly 100% recommend cake flour for red velvet cake. Cake flour is much lighter than all-purpose and the perfect base for a light, soft-crumbed cake texture. Like I mention above, red velvet’s texture is important to the authenticity of the flavor. Cake flour is sold at all major grocery stores, baking stores, or basically wherever there is a baking aisle. You will thank me for encouraging you to buy it after you taste how incredibly soft this cake is. It’s like the kind of texture you find at professional bakeries. And guess what? They pretty much always use cake flour in red velvet cake. Please see my recipe note about subbing all-purpose flour if you absolutely must.
Important red velvet cake tip #2: Unsweetened cocoa powder. 2 Tablespoons is just enough to give that very slight cocoa taste without overpowering the vanilla and butter flavors. Chocolate’s flavor, as you know, is quite strong.
Important red velvet cake tip #3: Butter and oil. What makes red velvet cake different from chocolate cake is its buttery flavor. When I began testing recipes for my red velvet cupcakes, I threw the butter flavor aside because all I could concentrate on was “make the cupcake moist.” And we all know oil brings so much moisture. But with oil we (1) don’t have that natural buttery flavor and (2) the cupcakes aren’t as light and soft, which is something creamed butter imparts into cakes, cupcakes, and muffins. Furthermore, I often find that too much oil weighs baked goods down. So, I use both oil and butter. Moist texture, soft and cakey texture, butter flavor. Boom.

Important red velvet cake tip #4: The eggs. I could write an entire post about my red velvet/egg methodology. I’ll try to avoid boring you by summarizing it. This is a very large layer cake, so you’ll be using 4 large eggs to provide richness, structure, binding, etc. You will separate the eggs before going into the red velvet cake batter. The yolks are beaten in with the creamed butter/sugar, then beat the egg whites to a frothy consistency and fold them in last. What is the point of this? I find that the fluffiest texture is achieved this way. Beating the egg whites incorporates air which, when folded into the cake batter, creates airy volume. (As opposed to just weighing it down.) So, there ya go.
Important red velvet cake tip #5: Buttermilk is a must. A little tangy, a lot of moisture, and ultra creamy. You can’t make this red velvet cake without it! Besides what buttermilk does for the taste and texture of red velvet cake, it also helps to activate the baking soda to leaven the cake. The vinegar does too- and it helps brighten the red color. Don’t get scared, a touch of vinegar is normal in red velvet desserts! You cannot taste it. Back to buttermilk, though. You can make a DIY version at home that works wonderfully in this red velvet cake recipe. In fact, in my cake testing (who wants to raid my freezer full of red velvet cake?) I tried both ways. Using actual buttermilk and using the DIY version. Both fantastic and identical in appearance, texture, and flavor. See my recipe notes for how to make a DIY buttermilk if you do not keep it on hand.
Advertisement
I really want you to make this cake, but I just have a couple more things before I leave you with the recipe. The cake layers are very thick. I love the look of nice, thick layers in a red velvet cake. You can bake this cake into three layers instead of two.
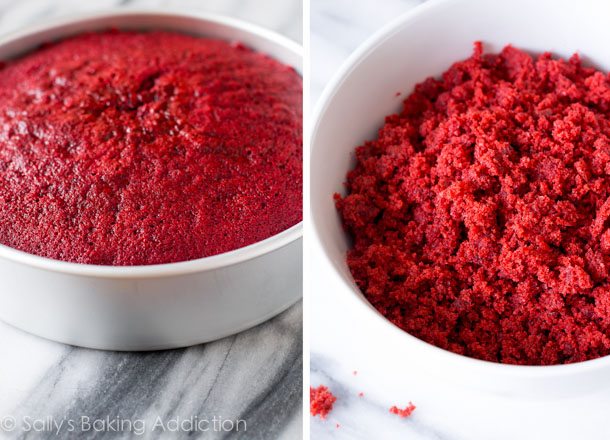
As I mention above, I love to use cream cheese frosting on my red velvet cakes. You can use another frosting you like such as vanilla or chocolate. In my opinion, cream cheese pairs best with the flavor of red velvet. I decorate the cake with cake crumbs. These are crumbs from the cake layers themselves. The cakes bake up to be quite tall, so I level them off with a large serrated knife and then crumble up that thin piece of cake to use as garnish.
As I mention above, I love to use cream cheese frosting on my red velvet cakes. You can use another frosting you like such as vanilla or chocolate. In my opinion, cream cheese pairs best with the flavor of red velvet. I decorate the cake with cake crumbs. These are crumbs from the cake layers themselves. The cakes bake up to be quite tall, so I level them off with a large serrated knife and then crumble up that thin piece of cake to use as garnish.

No comments:
Post a Comment